Forms
Search, display and edit forms with buttons and validation.
Adding the Forms in 10 steps
The tour shows how the control element can be integrated into an existing application, even after the fact.
FormTags - Form types
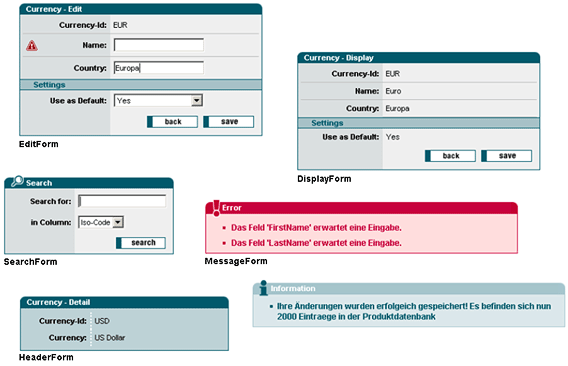
The Common Controls give the page designer the form types that come up again and again when building a user interface. Using them keeps the design of the application consistent, and the standard design can be adapted to your own requirements (corporate identity). The following form types are available at present:
- Input form
- Display form
- Form for error and success messages
- Search dialog
- Header
Object
In this tour we build an input form and implement two callback methods, one for the back button and one for the save button.
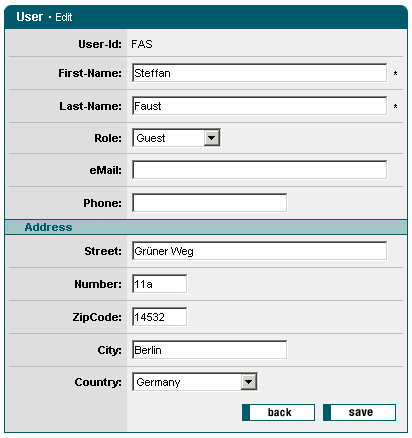
The form has two mandatory fields, which are to produce a message when validation fails:
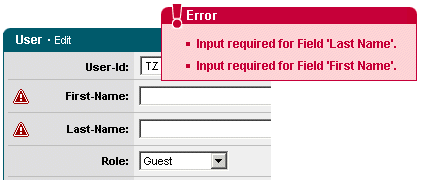
The tour covers the following points:
- Choosing the design of the user interface
- Writing the action class
- Providing the form data
- Defining the form structure in the JSP page
- Implementing the callback methods
- Validation and error presentation
1. Registering the painter factory
The first step is to register the painter factory. It determines the design of the user interface. This can be done for the whole application in the init() method of the front controller servlet.1 Here we choose the standard design provided by the DefaultPainter.2
import javax.servlet.ServletExceptionimport org.apache.struts.action.ActionServlet;import com.cc.framework.ui.painter.PainterFactoryimport com.cc.framework.ui.painter.def.DefPainterFactory;import com.cc.framework.ui.painter.html.HtmlPainterFactory;public class MyFrontController extends ActionServlet { public void init() throws ServletException { super.init(); // Register all Painter Factories // with the preferred GUI-Layout // In this case we only use the Default-Layout. PainterFactory.registerApplicationPainter ( getServletContext(), DefPainterFactory.instance()); PainterFactory.registerApplicationPainter ( getServletContext(), HtmlPainterFactory.instance()); }}*1) If individual users are to choose between different interface designs, additional painter factories are registered in the user session. This is usually done in the LoginAction with PainterFactory.registerSessionPainter() in session scope.
*2) Further designs (painter factories) are part of the Professional Edition, or you develop your own.
2. Deriving the action class for the Struts adapter
Our form is to edit the details of a user, so the action class that fills it is called "UserEditAction". It is derived from the class FWAction, which wraps the Struts action class and adds the functions of the presentation framework. Instead of execute(), the doExecute() method is called. [FWAction is derived from org.apache.struts.action.Action] It receives the ActionContext, which wraps the access to further objects such as the request and response object.
import java.io.IOException;import javax.servlet.ServletException;import com.cc.framework.adapter.struts.FWActionimport com.cc.framework.adapter.struts.ActionContextpublic class UserEditAction extends FWAction { /** * @see com.cc.framework.adapter.struts.FWAction#doExecute(ActionContext) */ public void doExecute(ActionContext ctx) throws IOException, ServletException { // Code follows in the next chapter }}3. Providing the form data
The form is filled from a form bean, the UserEditForm, which can be derived directly from org.apache.struts.action.ActionForm. To keep the example simple, the form bean is initialised with our user object, which has previously loaded the data for the key passed in the request from a database.
import java.io.IOException;import javax.servlet.ServletException;import com.cc.framework.adapter.struts.ActionContext;import com.cc.framework.adapter.struts.FWAction;public class UserEditAction extends FWAction { /** * @see com.cc.framework.adapter.struts.FWAction#doExecute(ActionContext) */ public void doExecute(ActionContext ctx) throws IOException, ServletException { String userId = ctx.request().getParameter("userid"); try { // Load the User User user = new User(userId); user.load(); // Initialise the Form with the User-Data UserEditForm form = (UserEditForm) ctx.form(); form.setUser(user); // In our Example we store the UserObject // in our Session ctx.session().setAttribute("userobj", user); } catch (Throwable t) { ctx.addGlobalError("Error: ", t); ctx.forwardByName(Forwards.BACK); } // Call the JSP-Page with the Form ctx.forwardToInput(); }}4. Defining the form structure in the JSP page
To use the form tags on a JSP page, the corresponding tag library has to be declared at the top of the page. The form elements are then available with the prefix <forms:tagname />. [The tag library also has to be listed in the deployment descriptor, the file WEB-INF/web.xml]. Besides input fields and selection boxes, our form contains a section that groups information and a button bar. The elements needed are defined by the following tags:
- <forms:form/> defines the form and sets its title.
- <forms:plaintext/> outputs text.
- <forms:text/> produces an input field. The required attribute marks mandatory fields.
- <forms:select/> defines a selection box.
- <forms:options/> defines the option list of a selection box.
- <forms:section/> defines and draws a section.
- <forms:buttonsection/> defines a button bar and sets the default button.
- <forms:button/> defines and draws a button.
- <forms:message/> draws a message dialog. The attribute severity="error" marks it as an error dialog.
<%@ taglib uri="/WEB-INF/struts-html.tld" prefix="html" %><%@ taglib uri="/WEB-INF/tlds/cc-forms.tld" prefix="forms" %><%@ taglib uri="/WEB-INF/tlds/cc-controls.tld" prefix="ctrl" %><forms:message caption="Error" severity="error"/><html:form action="/sample101/userEdit"> <forms:form type="edit" caption="User - Edit" formid="frmEdit"> <forms:plaintext label="User-Id" property="userId"/> <forms:text label="First-Name" property="lastName" size="45" required="true"/> <forms:text label="Last-Name" property="firstName" size="45" required="true"/> <forms:select label="Role" property="rolekey"> <ctrl:options property="roleOptions"/> </forms:select> <forms:text label="eMail" property="email" size="45"/> <forms:text label="Phone" property="phone" size="25" /> <forms:section title="Address"> <forms:text label="Street" property="street" size="45"/> <forms:text label="Number" property="streetnumber" size="5"/> <forms:text label="ZipCode" property="zipcode" size="5"/> <forms:text label="City" property="city" size="25"/> <forms:select label="Country" property="countrycode"> <ctrl:options property="countryOptions" labelProperty="country"/> </forms:select> </forms:section> <forms:buttonsection default="btnSave"> <forms:button name="btnBack" src="btnBack1.gif"/> <forms:button name="btnSave" src="btnSave1.gif"/> </forms:buttonsection> </forms:form></html:form>In our example the <forms:form> tag is embedded in the Struts tag <html:form/>. Through the action given there (/sample101/userEdit) it gets access to the form bean that provides the display data. The <forms:form> tag can also be used on its own without the Struts tag, but then the action attribute has to be given as well. All tags of the Common Controls library work together with the Struts tags where needed.
5. Implementing the callback methods
The back button and the save button of our form each raise a click event, which we react to within our action by adding two callback methods. The name of the method is made up of the name of the button and the suffix onClick. Form buttons have to be named with the prefix "btn", otherwise no callback method is called. The button btnBack therefore leads to a call of the method back_onClick. The method receives the FormActionContext, which wraps the access to the request and session object and to the form bean.
import java.io.IOException;import javax.servlet.ServletException;import com.cc.framework.adapter.struts.ActionContext;import com.cc.framework.adapter.struts.FWAction;import com.cc.framework.adapter.struts.FormActionContext;public class UserEditAction extends FWAction { /** * @see com.cc.framework.adapter.struts.FWAction#doExecute(ActionContext) */ public void doExecute(ActionContext ctx) throws IOException, ServletException { // Code see above } // ------------------------------------------------ // Event Handler // ------------------------------------------------ /** * This Method is called when the Back-Button is pressed. * @param ctx FormActionContext */ public void back_onClick(FormActionContext ctx) { ctx.forwardByName(Forwards.BACK); } /** * This Method is called when the Save-Button is pressed. * @param ctx FormActionContext */ public void save_onClick(FormActionContext ctx) { // See next Chapter }}6. Validation and error presentation
In our example the data is validated by the validate() method of the form bean. It is called within the UserEditAction as soon as the save button of our form has been clicked. The form can show a visual hint in front of the field an error occurred in. For that, the error message is put into the ActionErrors collection together with the name of the property concerned. The validation below produces the message "Input required for Field: First Name" and shows a warning sign in front of the field when nothing has been entered there.
import javax.servlet.http.HttpServletRequest;import org.apache.struts.action.ActionError;import org.apache.struts.action.ActionErrors;import org.apache.struts.action.ActionMapping;public class UserEditForm extends UserDisplayForm { /** * @see org.apache.struts.action.ActionForm#validate() */ public ActionErrors validate(ActionMapping mapping, HttpServletRequest request) { ActionErrors errors = new ActionErrors(); if ("".equals(firstName) ) { errors.add("firstName", new ActionError( "Input Required for Field: ", "First Name")); } if ("".equals(lastName) ) { errors.add("lastName", new ActionError( "Input Required for Field: ", "Last Name")); } return errors; }}Validation is triggered in the save_onClick() method, and any errors are put into the FormActionContext. As a result the matching error messages are shown once the input page is returned to. If validation succeeded, the changes can be written to the database. Errors can occur during that step too. In our example such errors are not shown on the input screen but on the screen we branched to the edit mode from: the error message is put into the context as well, and then the corresponding action is called. The trial version of the Common Controls contains the full source code for this. On success a message is passed to the user; the text is put into the FormActionContext through the method addGlobalMessage(). The input screen is then left again.
import java.io.IOException;import javax.servlet.ServletException;import com.cc.framework.adapter.struts.ActionContext;import com.cc.framework.adapter.struts.FWAction;import com.cc.framework.adapter.struts.FormActionContext;public class UserEditAction extends FWAction { // other code see above ... public void save_onClick(FormActionContext ctx) { UserEditForm form = (UserEditForm) ctx.form(); // Validate the Formdata ActionErrors errors = form.validate(ctx.mapping(), ctx.request()); ctx.addErrors(errors); // If there are any Errors return and display a Message if (ctx.hasErrors()) { ctx.forwardToInput(); return; } try { // In our Example we get the User-Object // from the Session User user = (User) ctx.session().getAttribute("userobj"); populateBusinessObject(ctx, user); user.update(); } catch (Throwable t) { ctx.addGlobalError("Error: ", t); ctx.forwardByName(Forwards.BACK); return; } // Generate a Success Message ctx.addGlobalMessage( "Data updated: ", form.getUserName()); ctx.forwardByName(Forwards.SUCCESS); }}Tour end
The example has shown how much quicker interfaces are built with form tags, and that they keep the design of an application consistent. Other designs are a matter of adapting the painters, and several designs can be used side by side.
Features of the form tags:
- A wide range of form elements (text, plaintext, textarea, select, button, button section, file, password, radio, spin, description, check box, section).
- Form elements can be grouped.
- Form elements are declared in the JSP page together with their label, description text, whether input is required and so on.
- Maps form events to event handlers in the action class.
- Shows faulty input.
- Supports hover effects on buttons.
- The design of the form can be defined in the JSP page or on the server side.
- The design can be adapted to your own style guide (corporate identity) through a painter factory.
- Same look and feel in Microsoft Internet Explorer > 5.x and Netscape Navigator > 7.x
Excursus: buttons with a hover effect
A hover effect takes one button image for the active state and one for the selected state. The active button is stored as a gif file with the prefix btn and the suffix 1.gif (btnBack1.gif, for instance). The hover effect uses a button ending in 3.gif (btnBack3.gif).
Naming convention and states of a form button:
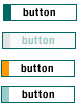
- Active: btnXXX1.gif
- Inactive: btnXXX3.gif
- Active and selected: btnXXX5.gif
- Pressed: btnXXX6.gif
The images are swapped automatically as soon as the mouse pointer moves over a form button. A JavaScript event handler takes care of that; it is registered for the MouseOver and MouseOut event in the file fw/def/jscript/controls.js.
The DefaultPainter includes this script in every HTML page automatically.
Ready-made configurations to take over
Screenshot, configuration and the matching JSP code.
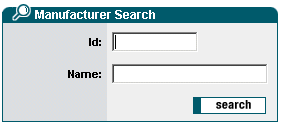
Configuration
- Two text fields for search criteria.
- Image for replaceable button (Hover effect). The image for the inactive state is saved under the name btnXXX1.gif. The image for the Hover effect under the name btnXXX3.gif. The images are automatically exchanged on moving over the button with the mouse.
<forms:form type="search" caption="Manufacturer Search" formid="frmSearch"> <forms:text label="Id" property="id" size="11" maxlength="10"/> <forms:text label="Name" property="name" size="25" maxlength="80"/> <forms:buttonsection> <forms:button name="btnSearch" src="fw/scc/image/buttons/btnSearch1.gif"/> </forms:buttonsection></forms:form>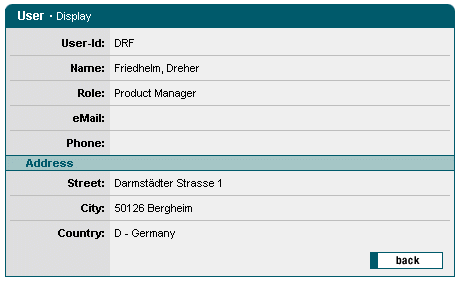
Configuration
- Formatting the title and form width
- Inclusion of various output fields for the information to be displayed.
- Definition of a sub-section.
- Incorporation of a Back button, which results, in the action, in the invocation of a back_onClick()-method.
<forms:form type="display" caption="User - Display" formid="frmDisplay" width="450"> <forms:plaintext label="User-Id" property="userId"/> <forms:plaintext label="Name" property="userName"/> <forms:plaintext label="Role" property="role.value"/> <forms:plaintext label="eMail" property="email"/> <forms:plaintext label="Phone" property="phone"/> <forms:section title="Address"> <forms:plaintext label="Street" property="fullStreet"/> <forms:plaintext label="City" property="fullCity"/> <forms:plaintext label="Country" property="fullCountry"/> </forms:section> <forms:buttonsection> <forms:button styleId="btnBack" name="btnBack" src="fw/cc/image/buttons/btnBack1.gif" title="Back"/> </forms:buttonsection></forms:form>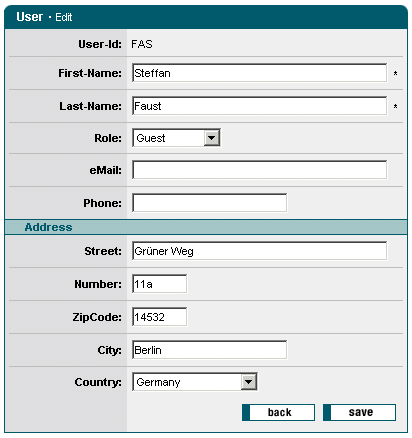
Configuration
- Formatting the title and form width.
- Incorporation of the input and output fields. Determining the mandatory input fields.
- Definition of a sub-section.
- Incorporation of a Back button, which results, in the action, in the invocation of a back_onClick()-method.
- Incorporation of a Save button, which results, in the action, in the invocation of a save_onClick()-method.
<forms:form type="edit" caption="User - Edit" formid="frmEdit"> <forms:plaintext label="User-Id" property="userId"/> <forms:text label="First-Name" property="lastName" size="45" required="true"/> <forms:text label="Last-Name" property="firstName" size="45" required="true"/> <forms:select label="Role" property="rolekey"> <ctrl:options property="roleOptions"/> </forms:select> <forms:text label="eMail" property="email" size="45" maxlength="256"/> <forms:text label="Phone" property="phone" size="25" /> <forms:section title="Address"> <forms:text label="Street" property="street" size="45" maxlength="80"/> <forms:text label="Number" property="streetnumber" size="5"/> <forms:text label="ZipCode" property="zipcode" size="5"/> <forms:text label="City" property="city" size="25"/> <forms:select label="Country" property="countrycode"> <ctrl:options property="countryOptions" labelProperty="country"/> </forms:select> </forms:section> <forms:buttonsection default="btnSave"> <forms:button name="btnBack" src="fw/cc/image/buttons/btnBack1.gif" title="Back"/> <forms:button name="btnSave" src="fw/cc/image/buttons/btnSave1.gif" title="Save"/> </forms:buttonsection></forms:form>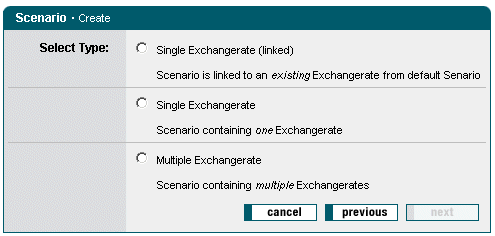
Configuration
No bullet points are recorded for this example – the configuration follows from the code.
<forms:form type="edit" caption="User - Edit" formid="frmEdit"> <forms:plaintext label="User-Id" property="userId"/> <forms:text label="First-Name" property="lastName" size="45" required="true"/> <forms:text label="Last-Name" property="firstName" size="45" required="true"/> <forms:select label="Role" property="rolekey"> <ctrl:options property="roleOptions"/> </forms:select> <forms:text label="eMail" property="email" size="45" maxlength="256"/> <forms:text label="Phone" property="phone" size="25" /> <forms:section title="Address"> <forms:text label="Street" property="street" size="45" maxlength="80"/> <forms:text label="Number" property="streetnumber" size="5"/> <forms:text label="ZipCode" property="zipcode" size="5"/> <forms:text label="City" property="city" size="25"/> <forms:select label="Country" property="countrycode"> <ctrl:options property="countryOptions" labelProperty="country"/> </forms:select> </forms:section> <forms:buttonsection default="btnSave"> <forms:button name="btnBack" src="fw/cc/image/buttons/btnBack1.gif" title="Back"/> <forms:button name="btnSave" src="fw/cc/image/buttons/btnSave1.gif" title="Save"/> </forms:buttonsection></forms:form>